Free lampworking tutorial – Pulling Cane from Recycled Glass – Upcycled Glass Beads
Hi again! I promised this tutorial over a year ago and its super easy, but for some reason I only got around to it this week.
Upcycled Glass Bottle Beads are super easy to make, but I’ve had loads of questions about how to deal with the shards of glass without them shattering when the flame hits them. I tend to pull them into cane to store them and I preheat the finished cane in a kiln when I’m ready to use them.
Remember, these bottles might not all be the same COE (coefficient of expansion), so I tend to make them into single-color beads. So, your first thing to do is to get some bottles!
Lets take a look at some of the ones I like to use.
—————-
BROWN BEER BOTTLES
Brown beer bottles tend to make pretty scummy cane. They boil a lot. I still really like them because the finished beads look rougher, which makes for some nice “upcycled texture.”
GREEN BEER BOTTLES
Heinekein beer bottles are great to pull into cane. They are smooth to work with and don’t shatter easily when you reintroduce them to the flame.
WHITE WINE BOTTLES
White wine bottles come in a whole range of color, but I like these light olivine bottles the best. They are super creamy to work with and just have a wodnerful color to them.
RED WINE BOTTLES
These also come in a whole range of colors. The darker ones just read as black when you make a bead. I don’t use these a whole lot. The clear bottles get really scummy in the flame.
SAPPHIRE GIN BOTTLE
LOVE this color bottle for beads. It can be a little shocky to work with though.
SKY VODKA
Makes a clear, good cobalt blue bead. This is the glass I’ll be using for the tutorial.
————————-
READY TO GET MOVING ON YOUR BEADS?
So… you got your bottles, but you know, they are a little big to work with directly. So, get yourself a box and a set of glasses and dust mask and a good metal hammer. Head outside. Put your bottle into the box, slip on your dust mask and glasses, and give that bottle a couple of good taps. I actually set my bottle into the box, and cover most of it with the box flaps. I leave just enough to see what I’m up to. You want some shards that are about 4.”
Grab those shards – throw the rest of the box away. Its full of glass dust. Remember, the edges are really sharp!
Throw those shards into a kiln and ramp it up. I work at 950, and I just ramp up at full, but if you are worried about the shards cracking, you can ramp it up at a slower rate.
Once the shards are at full temperature, you’ll pull them out with tweezers (or hemostats) and attach them to a punty. I use a 1/8″ mandrel. You’ll need to heat the punty to glow and also the shard.
…….
Next, you’ll be heating that shard until its all gooey and starts to flop around. I actually fold it up on itself, but its really important to not let air get caught in it, otherwise your finished cane will be super shocky. Continue to heat until you have a good blob. You’re going to need to add a second punty, so you can actually do that at the beginning, so you have more control over your molten glass.
Heat your glass until its all glowing. If you haven’t already added that second punty, now is the time to do it. You want it to be evenly glowing and a good round or oval shape.
Pull your glowy molten mass out of the flame and wait for a “skin” to appear on it. Start pulling, slowly and gently. When the cane reaches and thickness you like, you can blow on that area to “set” it. Since heat rises, you’ll be able to tip the hotter area upwards and continue to pull until you have a cane. The one I’m working on here is pretty short, but its a good starting point for you.
As a side note, it looks like I’m pulling this in the flame, but it actually isn’t. Its all in front of the flame.
Break off the punties and either immediately use your cane or place it in the kiln while you make others.
Here, I’m making a bead from my blue cane (remember to hold it with hemostats or tweezers since its just come from the kiln)… You can see where my cane has cracked a little. This is because I was waving the whole thing around too long while I fussed with the camera.
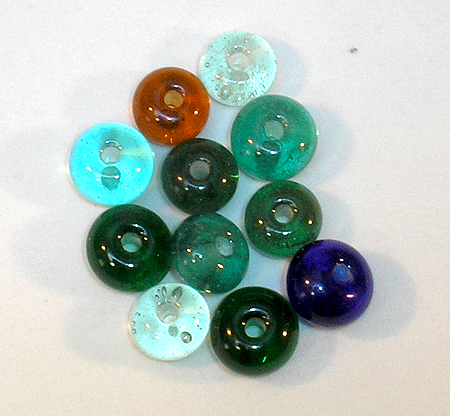
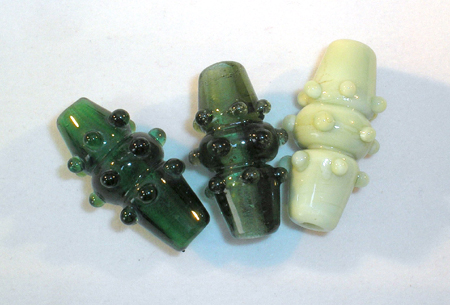
And here are some finished recycled glass beads! You can purchase these at
http://www.goodrivergalleries.com/catalogrecycledbeads.htm


HAVE FUN! Now, lets see what you’ve made!
Related articles
- How to Upcycle your Holiday Glass bottles (instructables.com)
- Lampwork Tutorials From Good River Gallery (goodrivergallery.wordpress.com)


February 3, 2013 at 10:41 am
Thanks Hannah,
I had saved some bottles to try this with but had not attempted it yet. I would not have thought about the preheating. Do you treat it like soft glass or boro? Or what type of eye wear protection do you think should be worn, and at what temp should the bead be annealed at?
Sara
February 3, 2013 at 10:49 am
Hi Sara! Happy Sunday to you! I anneal at 950, so I can garage the beads as I make them and preheat the shards and finished rods. Also, the stuff is soft glass, but tends to move a little slower than 104. I think it’s closer to 90 COE, but each bottle is slightly different and I wouldn’t combine them.
February 3, 2013 at 10:52 am
Although I am not a lampworker (I am a weaver), I loved seeing bottles recycled into beautiful beads! Congratulations, Hannah!
February 4, 2013 at 8:30 pm
Hi mom! I didn't know that you were a weaver! That's so cool. When did you start?Kidding. We should totally share your Etsy shop…HEY EVERYONE! Here's my talented mom's Etsy shop! joyrosner.etsy.comBTW, you were featured in one of my end-of-January blog posts. http://goodrivergallery.blogspot.com/2013/01/end-of-month-etsy-shopping-spree.html
March 3, 2013 at 2:08 pm
[…] Free lampworking tutorial – Pulling Cane from Recycled Glass – Upcycled Glass Beads (goodrivergallery.wordpress.com) […]
April 12, 2014 at 8:55 am
Great information! I have done this with some cobalt blue drinking glasses that cracked and I couldn’t bear to throw away. But I didn’t heat them in the kiln, which would have been so much better. Lucky for me the glass, which I am guessing from a pull-test is around 90 coe wasn’t terribly shock.
September 13, 2015 at 10:11 pm
Hi Nina! It works best if you do preheat, but if you use pretty small pieces and introduce them slowly into the flame as I suspect you did, you can sometimes get away with it. Glad you had fun!
September 12, 2015 at 12:34 pm
Hi Hannah. I’m new to the world of lamp work and I have to say it’s awesome. Unfortunately I’m lacking a kiln and mainly just use my blow torch for all my projects. So my question here is what else can you use to preheat your glass other than a kiln for this project?
September 13, 2015 at 10:10 pm
Hi Sarah! You can use a hot plate or beverage warmer but it really won’t do as well as the kiln will to preheat. Another option is just to break the glass into really small pieces and then slowly (really really slowly) heat them in your flame. You may find that they still pop and crack, however. Good luck!
February 15, 2019 at 5:23 pm
[…] https://goodrivergallery.wordpress.com/2013/02/02/free-lampworking-tutorial-pulling-cane-from-recycl… […]