Finding Inspiration and Making Your Own Design: A guide to seeing the lampworking world around you.
By Hannah Rosner
For Soda Lime Times 2018
(back issues of Soda Lime Times are available at https://www.sodalimetimes.com/)
Are you stuck trying to think of something “new” to make? Feeling like the colder days have you in a creative slump? Wondering why everyone else seems to be coming up with ideas but you can’t? My journey to my design work hasn’t been a
quick one – some of our current designers show up 100% able to put together a
piece that screams of THEM and always seem to have something new. I had put in a lot of time working before I finally got it together. So when Karen Leonardo and I started talking about this article for Soda Lime Times, I thought that I’d take you
on a little journey on what has inspired me. Hopefully, you can find something that inspires you, too!
1. Take Classes!
The best way to start is to learn from the artists you really admire. Since fear is generally
what holds people back the most, taking a class is the best way to learn a
technique without second guessing your ideas, designs, steps or colors. However, it becomes more and more important to credit your teachers and to ask permission to sell the pieces that you learn in their classes.
what holds people back the most, taking a class is the best way to learn a
technique without second guessing your ideas, designs, steps or colors. However, it becomes more and more important to credit your teachers and to ask permission to sell the pieces that you learn in their classes.
I began my jewelry and design journey with seed bead work and then decided to add lampworking to augment my pieces. I thought I’d save some money by making my
own glass beads. You know, how well that plan worked! In 1992, I took a glass
bead making workshop from Milissa Montini in Pittsburgh. It was pretty much love the first time I turned on the hothead torch, but I was really at hobbyist level until about
2008 and moved to New Mexico. Still, making my own beads opened up all kinds of new design ideas for me since I was looking for excuses to use my handmade beads in my work.
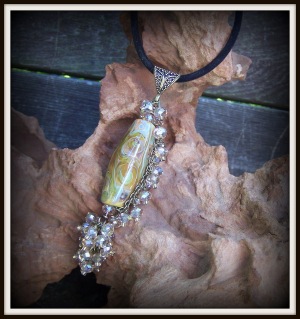
photo 1 – My first beading pattern using my own lampwork bead.
This simple Cascade Pendant was also the first tutorial I ever got
published in a national magazine – Beadstyle.
Photo, bead and wirewrapping by Hannah Rosner
This simple Cascade Pendant was also the first tutorial I ever got
published in a national magazine – Beadstyle.
Photo, bead and wirewrapping by Hannah Rosner
I was recruited out of grad school to teach at both the Art Institute of Pittsburgh and also at the Illinois Institute of Art, both owned by the Art Institutes International, for a number of years. My college teaching career moved through drawing and color theory classes into multimedia and web design classes. This was a fortunate move since I think these days an artist has to be really good at self-promotion online in order to make
it. As I taught, I also learned. My photos got better and my graphic design
skills improved. I would have stayed on with the company – I really enjoyed it – but I had that unfinished grad degree in scenic and costume design to finish up.
it. As I taught, I also learned. My photos got better and my graphic design
skills improved. I would have stayed on with the company – I really enjoyed it – but I had that unfinished grad degree in scenic and costume design to finish up.
I was lucky – not everyone has the opportunity to go to graduate school for design. I had no idea how much work grad school was going to be – or how inspiring – or how I
could survive on that little sleep! But even if you don’t have the time or energy to go through a graduate program, take those classes from other artists. After Milissa’s class, I’ve had to opportunity to learn from many wonderful instructors and none of the time has ever been wasted.
could survive on that little sleep! But even if you don’t have the time or energy to go through a graduate program, take those classes from other artists. After Milissa’s class, I’ve had to opportunity to learn from many wonderful instructors and none of the time has ever been wasted.
See who is teaching in your area – you may not have to travel far to get a great class. Nothing beats taking a class in person. But, if you really have nothing available, sign up for an online class and actually do it – don’t just watch it and put it aside for later. Carve out a time to actually make that thing! You can do this even if you’re currently cash poor – YouTube is always available and you’re reading an article I wrote for Soda Lime Times
right now! Pick a project and actually make it. Worried about whether it will turn out? Who cares?
If its from YouTube or Soda Lime Times nobody actually has to see it unless its awesome.
right now! Pick a project and actually make it. Worried about whether it will turn out? Who cares?
If its from YouTube or Soda Lime Times nobody actually has to see it unless its awesome.
Assignment #1 – Sign up to take a
class or actually make a piece from a tutorial you have already.
class or actually make a piece from a tutorial you have already.
2. Visit (or move) somewhere wonderful!
After I finished grad school, I taught classes at bead stores and a not-for-profit glass education center in the Midwest and did a number of bead shows. I also did a lot of travelling to the Czech Republic and to the Southwest. For me, traveling is hugely inspirational. I took plenty of photos and used them as both design inspiration and also as color inspiration. One of the things I started doing in grad school was a design scrap book, organized into sections that had inspirational colors, patterns or lighting. When I’m really stuck, sometimes I’ll flip through my scrapbook until I find a color
palette that appeals to me.
palette that appeals to me.
Finally, I picked up and moved West. The two years I lived in Taos absolutely changed my work. Strangely enough, I started doing things that were more floral inspired. The weather there is fabulous, but its high desert so a pretty sparse landscape.
Photo
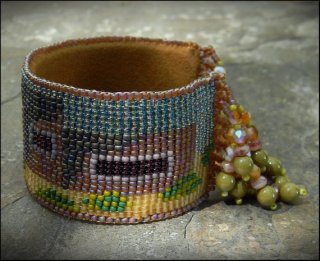
2a– a photo of the house next to my casita in Taos. It’s the inspiration for a current
project.
2a– a photo of the house next to my casita in Taos. It’s the inspiration for a current
project.
Photo 2b – an older bracelet I
made based off the Taos Pueblo.
made based off the Taos Pueblo.
Now I’m living in Oregon, which is also gorgeous.
Assignment #2 – Take a sightseeing trip, even if its just to somewhere local. If you can’t get away from your town or city, think about what you could show a friend if they came to visit you.
Take photos as if you’re a tourist. When you look at these photos, think about what you like about that place. Is it the colors? The curve of a particular tree trunk? Try to make a project based just on what you liked. Even if you feel like your hometown doesn’t have a thing going for it, you have an option. Is there somewhere you’ve always wanted to visit? Look up photos of that place. Jot down what you like about it – again, is it the colors? Is it a particular building? Whatever it is, try to make a project out of it. If you get stuck on the steps, go back to assignment #1. Find the closest class/video/tutorial to it and follow those steps – now apply it to this project about this place.
Take photos as if you’re a tourist. When you look at these photos, think about what you like about that place. Is it the colors? The curve of a particular tree trunk? Try to make a project based just on what you liked. Even if you feel like your hometown doesn’t have a thing going for it, you have an option. Is there somewhere you’ve always wanted to visit? Look up photos of that place. Jot down what you like about it – again, is it the colors? Is it a particular building? Whatever it is, try to make a project out of it. If you get stuck on the steps, go back to assignment #1. Find the closest class/video/tutorial to it and follow those steps – now apply it to this project about this place.
3. Splurge on New Tools!
When I moved to Taos I gave up my little hothead torch because someone told me that I couldn’t actually work it at that high an altitude. I bought a new torch and although
we had a hate/hate relationship it turned out to be just large enough to handle
making more dramatic and sculptural shapes… Once I finally sold that torch
and bought my current torch, a Carlisle Hellcat, I really fell in love with
lampworking again. I’m not telling you that a larger torch is better – I adored my little hothead – but for me that new Carlisle also opened new doors.
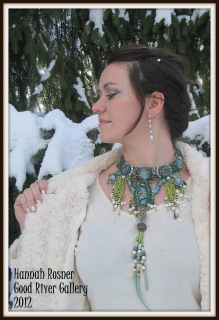
photo 3 – Danielle Wenger wearing a neckpiece I made for the Battle of The Beadsmiths in 2012. My Carlisle torch made it possible for me to make large scale centerpieces like the dragon bead in this piece. Photo by me.
After years of pining over a Carlo Dona Bellflower Press I finally splurged on one. Its beautiful – and it is absolutely one of the simplest presses to use. I ruined exactly one flower before I got the hang of it.
Routinely, Shawn brings in new tools for me to test – I’m partial to the hand turned hardwood handles. You can find his tools at http://ShawnTuckerGlass.etsy.com
I’ve found that if you have a tool that fits comfortably in your hand,
you’ll really go out of your way to find reasons and ways to use it. Most of the tools I owned but didn’t use were actually uncomfortable for me because I have super small hands. Fortunately, if you end up with a tool you aren’t crazy about, sales are pretty easy.
Assignment #3 – Buy some stuff! Shopping therapy is always
awesome. Or, if you have a tool you’ve never used, now is the time to try it out! Worried about how it works? Go back to assignment #1 – look up a tutorial/video or take a class with it!
awesome. Or, if you have a tool you’ve never used, now is the time to try it out! Worried about how it works? Go back to assignment #1 – look up a tutorial/video or take a class with it!
4. Look at Art Books and Visit Museums
When I’m really stuck, I open Jansson’s History of Art. There are centuries worth of inspiration in there. Be aware that some of the pieces still need permission to use as inspiration.
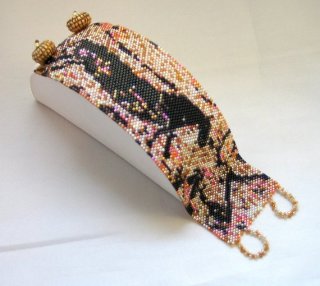
photo 4a – Beaded Cuff Bracelet based off one of the oldest pieces of
art in existence – the Lasceaux Cave Painting in France.
art in existence – the Lasceaux Cave Painting in France.
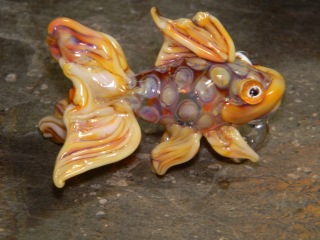
I also adore museums and was lucky enough to have had a grandmother who lived within walking distance of the Metropolitan Museum of Art in New York City. Growing up, my parents were members of the Chicago Museum of Art, the Field Museum of Natural History and the Shedd Aquarium, all of which are world class. Because they are so large, I usually go with an agenda but one day I found myself mesmerized by a ridiculous goldfish (yes, just a goldfish!) at the Aquarium while on my way to a completely different exhibit
photo 4b – Goldfish bead. Photo by me. Ain’t he silly?
Here in Grants Pass Oregon where I currently live, we don’t
have a huge museum but whenever I travel and visit a city with a good museum I
try to stop by and browse. Don’t overlook the universities, either. I
once saw a fantastic exhibit on Chinese textiles in a small hall at the Oregon
State University in Eugene.
have a huge museum but whenever I travel and visit a city with a good museum I
try to stop by and browse. Don’t overlook the universities, either. I
once saw a fantastic exhibit on Chinese textiles in a small hall at the Oregon
State University in Eugene.
Assignment #4 – Go to the library and get some art books or check out your local museum even if its little. You’d be amazed how much better it is to see big glossy photos in a real art book or see things in real life instead of just on your computer screen. You generally can’t take photos at the museums, but you can jot down notes or doodle so bring a pad. No library or museum in your town? There are always online book stores.
5. Work and Play with Others
When you can, go to Open Torch Events. Just visiting with other lampworkers can get
your creativity flowing. As a matter of fact generally going to any art events can do the same thing, even if you are using different mediums – or think “how can I use these two mediums I enjoy doing IN THE SAME PIECE?” Shawn and I routinely now do collaborative multimedia work that includes boro, soft glass, wire wrapping, seed beading and sometimes fiber. Sometimes just working with another artist’s
bead can make for wonderful inspiration!
photo 5 – Neptune’s Collar. This piece was designed around a John Winter
bead I purchased when I took a class from him at Bead & Button one year. In class, I made beads to match the centerpiece and then added a color palette that augmented the colors in the beads. Worn by Danielle Wenger. I took the photo.
bead I purchased when I took a class from him at Bead & Button one year. In class, I made beads to match the centerpiece and then added a color palette that augmented the colors in the beads. Worn by Danielle Wenger. I took the photo.
I’ve had the opportunity to teach twice with beading rock star Sherry Serafini. We codesigned two separate projects and then taught them, once at a bead store in Georgia and once at Bead & Button. When you can work with someone you enjoy, it sort of just feels like you’re partying.
Assignment #5 – Go to a retreat or a conference. You’ll probably even be able to take a class there! Nothing available in your area or not able to cover the hotel costs? Then, head over to a local bead society for a meeting or go to a gallery opening, even if it just for a little gallery in your town. Just talk to another artist. Even
just going to hang with a lampwork buddy can inspire you – it doesn’t always have to be a collaborative piece; just bouncing ideas off someone can be inspiring.
just going to hang with a lampwork buddy can inspire you – it doesn’t always have to be a collaborative piece; just bouncing ideas off someone can be inspiring.
6. Challenge Yourself
Contests and Competitions might seem like a lot of stressbut they can also stretch you artistically! Remember, you don’t have to showthe finished project to anyone, so just do
it. Much of my inspiration thesedays comes from deadlines, whether it is for an online event like Battle of The Beadsmith, a magazine issue, a competition, a special order lampwork piece, or from Starman and/or Toho Beads sending me new unreleased beads to test. I particularly like it when I’m given a palette of colors I wouldn’t generally put together and am asked to make something from them.
it. Much of my inspiration thesedays comes from deadlines, whether it is for an online event like Battle of The Beadsmith, a magazine issue, a competition, a special order lampwork piece, or from Starman and/or Toho Beads sending me new unreleased beads to test. I particularly like it when I’m given a palette of colors I wouldn’t generally put together and am asked to make something from them.
Assignment #6 – Pick a challenge
and make it, even if the results are so bad they’re hilarious.
and make it, even if the results are so bad they’re hilarious.
Because lets face it, even if your finished project is theabsolute worst, I’ll bet it was
interesting to make a brand new thing. Then look at it and think: “Well, next time I can make this better and here’s how…”
interesting to make a brand new thing. Then look at it and think: “Well, next time I can make this better and here’s how…”
Enjoy!



Leave a comment