Diamond/Herringbone Tweed Bracelet – a free pattern!

While I was working with Starman Beads, I wrote this tutorial for their trendsetter program.  Of course its been years now and I can’t find a photo of my finished design (although it is in the PDFs attached).  However, here are two photos that I think were stitched by Red Panda Beads.

Two versions of the tutorial – one with fancy-looking diagrams that they did for me and another with no diagrams but with photos and some finishing techniques.  Enjoy!

P.S.  If you make this, please post it on Facebook and tag me!

A FEW THOUGHTS ABOUT MEMORIAL GLASS BEADS…

By Hannah Rosner

Originally written for Soda Lime Times,  2019

The preservation of a loved one has fascinated people since the beginning of history. Funerary rites and preservation were a huge part of Egyptian religion.  Parts of saints (holy relics) were commonly displayed in churches in the Middle Ages.  In Victorian times just after the development of the camera, weird family portraits with their departed family members were  pretty common, and people would place locks of their loved ones hair in rings or mourning brooches.  As a result, making jewelry from ashes isn’t as bizarre an idea as you might think.

About ten years ago, a colleague of about making glass jewelry pieces with pet ashes (cremains) in them for a new business she was launching.  I designed a large hole bead with a little cubic zircon and ashes, and two pendants for her to try out.  I tend to refer to them as memory glass pieces.

At the time, she was working in Computer Engineering and thinking of making a chance to what she hoped was a more art-related field.  Using a pretty substantial loan and most of her savings, she set up a business plan that involved a website, catalogue, samples to go to funeral homes and a huge amount of travel to conferences.  When I called her about this article, she told me that what surprised her the most in setting up her business was the expense of the liability insurance; handling ashes is a huge responsibility and also a sensitive one

So, you want to try your hand at making some, but you are wondering how to approach people about it?  There are a few considerations.

  1.  Take Religion into Account

You may want to start by bearing religion in mind.  Some religions do not allow cremation at all, so there isn’t even the option of a discussion.  Others allow cremation, but don’t allow separation of the ashes.  What this means for them is that an urn is the only option.  The urn can be buried, but ashes cannot be scattered and small amounts certainly cannot be made into jewelry pieces.  The variations and views are endless.  Even within religions, views can vary from person to person.  It makes things difficult, right?  How do you even bring up the topic when it can actually offend?

  1.  Be sensitive to how difficult a time the grieving family is having.

Even if the death was expected, people might deal with their grief in unexpected ways.  Be careful of their feelings.  Much of what I did was through my rep, but from time to time in the past decade friends contacted me, or they recommended my work to other friends.  I have almost never contacted anyone directly except in two instances and both of those times friends hinted (really blatantly) that would like me to make something for them.

I called a local funeral home for further advice.  The owner (Bob) took some time to talk with me. Funeral homes have been trained in grief counseling so they can help you with the sensitivity towards the families.  In addition, Bob felt that approaching families directly was somewhat usurious if you don’t know them already.

  1. Be responsible to the family

Bob suggested that if you are interested in adding the making of memory glass pieces to your regular portfolio, drop by full color brochures and/or catalogues to your local funeral directors along with specific time frames in which you can complete orders.  Samples are also appreciated.

Funeral homes take all liability, but they expect a certain amount of professionalism and responsibility from you when they turn over the ashes.  You must be able to give a complete description of size, color and time frame in which the item can be completed.  When a family arrives at a funeral home, they are usually shown a parlor with all available products on display.  From that point on, Bob likes to be hands off.  He will give more information only if a family seems interested.  He told me that many families already have some ideas of what they would like to see done with the ashes if they have chosen already to separate them.

  1. Thinking of trying online sales?  Be mindful of shipping

Finally, I looked up ashes jewelry on Etsy and found a huge selection.  Etsy does not allow items made with human remains, so glass items made with ashes on Etsy are for pet memorials only.  Many of the shops do not mention liability in their listings which scares me, but shipping also becomes a consideration.  You’ll need the families to send a small amount of ashes to you.  Generally companies send out a small “collection packet” with a vial for the ashes, an envelope (priority mail or express only so you have tracking information at all times) and instructions.  You can build the cost of this packet and shipping back to you within the original price point.  Some companies charge a nominal fee when they send out these packets, which is refunded with the actual order.  Within Etsy, however, you would be receiving the full made to order price at the onset of your work so this would be unnecessary.

Always remember , you are working for a family who is grieving.  It is probably one of the hardest times in their lives.  Since some people can’t actually read a three dimensional image when they see a photograph, I worry about what they think they are getting during this particularly difficult time.  In addition, even if you give sizes in both millimeters and inches, what they imagine this item’s size to be may be completely different from what you are offering.  Photographing with a coin alleviates this a bit.

I’ve never felt comfortable putting pieces up, but if you are really interested in reading a bunch of legalese regarding liability, sensitivity issues and responsibility of the maker and the customer when it comes to cremains art,  get a cup of coffee, then do a search on any web browser for “cremation jewelry.”  Try to pick a company website that seems professional and large – there are three main ones – and then sit back.  You might be looking at up to 5 separate sections and you’ll learn a ton.

Here’s a final idea for web sales though.  Much of the memorial jewelry on Etsy doesn’t actually mix the ashes with the glass (or resin).  A lot is hollow and can be customized with a name.  It is up to the family, then to handle the ashes and add them to these little mini urns.  This gets rid of any liability issue, but it does mean that you’ll need to provide a really good cork or other top and instructions on how to fill them.

For those of you who are reading this and thinking of a loved one…  I’m so sorry for your loss.  Please keep your good memories close, whatever form those memories take.


Please join us at our August Online Art Fair, featuring the work of 10 artists.
https://www.facebook.com/groups/GoodRiverGallery/
We will be hanging around here from August 8th – 15th. Drop on by and look around! We may also do some live events and demos – drop by for future updates.

Featuring work from:
Carol Brobst – FIBER
Kerry Collett – DECALS & TSHIRTS
Michael Mangiafico – LAMPWORK PENDANTS & EARRINGS
Helen O’Donnell – CORK EARRINGS & BOTANICAL PENDANTS
Hannah Rosner – WIREWRAPPED KEY PENDANTS
Emery Sisson Lawson – BEADED JEWELRY & SOFT GLASS MARBLES
Ben Lukas – GLASSWORK
Julia L Powell – PAINTINGS & BEADED JEWELRY
Kim Tamarin – KUMIHIMO
Shawn Tucker – BORO MARBLES


215-2154505_common-sunflower-drawing-watercolor-painting-clip-art-sunflower-drawing

Please join us for a Virtual Art Fair!

Now until April 3rd.

Featuring work by

Carol Brobst (Ambrosian Fiber Arts) – Handwoven Scarves

Kerry Collett (Celt Craft Designs) – Fused Glass Jewelry and Household Items

Emery Sisson Lawson (Emme’s Gems) – Wirewrapped and Beaded Jewelry

Michael Mangiafico (Forms in Glass) – Glasswork – Tiny Vessels, Glass Latticino Eggs, Glass Fossils

Helen O’Donnell (A Field of Beads) – Botanical and Cork Jewelry

Kim Tamarin (Tambrook Kumihimo) – Beaded Kumihimo Jewelry

Debbie Tarry (Works In Glass) – Glass and Pine Needle Basketry

And… Shawn Tucker and I (Good River Gallery)

On my Good River Gallery Facebook group!

https://www.facebook.com/groups/GoodRiverGallery

Please join us for a Virtual Art Fair!

March 27th – April 3rd.

Opening night – March 27th at 8pm Eastern (5pm Pacific)

Featuring work by

Carol Brobst (Ambrosian Fiber Arts)

Kerry Collett (Celt Craft Designs)

Ron Hansen (Handmade by Hansen)

Heather Hertziger (T&H Fiberworks)

Emery Sisson Lawson (Emme’s Gems)

Michael Mangiafico (Forms in Glass)

Helen O’Donnell (A Field of Beads)

Kim Tamarin (Tambrook Kumihimo)

Debbie Tarry (Works In Glass)

On my Good River Gallery Facebook group!

https://www.facebook.com/groups/GoodRiverGallery 

IMG_3839-faded

Humboldt Marble Weekend February 7 & 8. Eureka, CA

Shawn and I will be selling at the Humboldt Marble Weekend!

Where: Redwood Acres Home Franceschi Hall, main building. 3750 Harris St, Eureka CA
When: noon-6pm. February 7 & 8, 2020
Come on by and say hello!

For full details about the event as well as other events in the marble weekend drop on by their website. https://www.humboldtmarbleweekend.com


Finding Inspiration and Making Your Own Design: A guide to seeing the lampworking world around you.
By Hannah Rosner
For Soda Lime Times 2018
(back issues of Soda Lime Times are available at https://www.sodalimetimes.com/)
 
Are you stuck trying to think of something “new” to make?  Feeling like the colder days have you in a creative slump?  Wondering why everyone else seems to be coming up with ideas but you can’t?  My journey to my design work hasn’t been a
quick one – some of our current designers show up 100% able to put together a
piece that screams of THEM and always seem to have something new.  I had put in a lot of time working before I finally got it together.  So when Karen Leonardo and I started talking about this article for Soda Lime Times, I thought that I’d take you
on a little journey on what has inspired me.  Hopefully, you can find something that inspires you, too!
1.      Take Classes!
 
The best way to start is to learn from the artists you really admire.  Since fear is generally
what holds people back the most, taking a class is the best way to learn a
technique without second guessing your ideas, designs, steps or colors.  However, it becomes more and more important to credit your teachers and to ask permission to sell the pieces that you learn in their classes.
I began my jewelry and design journey with seed bead work and then decided to add lampworking to augment my pieces.  I thought I’d save some money by making my
own glass beads.  You know, how well that plan worked!  In 1992, I took a glass
bead making workshop from Milissa Montini in Pittsburgh.  It was pretty much love the first time I turned on the hothead torch, but I was really at hobbyist level until about
2008 and moved to New Mexico.  Still, making my own beads opened up all kinds of new design ideas for me since I was looking for excuses to use my handmade beads in my work.


photo 1 – My first beading pattern using my own lampwork bead.
This simple Cascade Pendant was also the first tutorial I ever got
published in a national magazine – Beadstyle.
Photo, bead and wirewrapping by Hannah Rosner
I was recruited out of grad school to teach at both the Art Institute of Pittsburgh and also at the Illinois Institute of Art, both owned by the Art Institutes International, for a number of years.  My college teaching career moved through drawing and color theory classes into multimedia and web design classes.  This was a fortunate move since I think these days an artist has to be really good at self-promotion online in order to make
it.  As I taught, I also learned.  My photos got better and my graphic design
skills improved.  I would have stayed on with the company – I really enjoyed it – but I had that unfinished grad degree in scenic and costume design to finish up.
I was lucky – not everyone has the opportunity to go to graduate school for design.  I had no idea how much work grad school was going to be – or how inspiring – or how I
could survive on that little sleep!  But even if you don’t have the time or energy to go through a graduate program, take those classes from other artists.  After Milissa’s class, I’ve had to opportunity to learn from many wonderful instructors and none of the time has ever been wasted.
See who is teaching in your area – you may not have to travel far to get a great class.  Nothing beats taking a class in person.  But, if you really have nothing available, sign up for an online class and actually do it – don’t just watch it and put it aside for later.  Carve out a time to actually make that thing!  You can do this even if you’re currently cash poor – YouTube is always available and you’re reading an article I wrote for Soda Lime Times
right now!  Pick a project and actually make it.  Worried about whether it will turn out?  Who cares?
If its from YouTube or Soda Lime Times nobody actually has to see it unless its awesome.
Assignment #1 – Sign up to take a
class or actually make a piece from a tutorial you have already.
 
2.      Visit (or move) somewhere wonderful!
 
After I finished grad school,  I taught classes at bead stores and a not-for-profit glass education center in the Midwest and did a number of bead shows.  I also did a lot of travelling to the Czech Republic and to the Southwest.  For me, traveling is hugely inspirational.  I took plenty of photos and used them as both design inspiration and also as color inspiration.  One of the things I started doing in grad school was a design scrap book, organized into sections that had inspirational colors, patterns or lighting.  When I’m really stuck, sometimes I’ll flip through my scrapbook until I find a color
palette that appeals to me.
Finally, I picked up and moved West.  The two years I lived in Taos absolutely changed my work.  Strangely enough, I started doing things that were more floral inspired.  The weather there is fabulous, but its high desert so a pretty sparse landscape.  
Photo
2a– a photo of the house next to my casita in Taos.  It’s the inspiration for a current
project.  
Photo 2b – an older bracelet I
made based off the Taos Pueblo.
Now I’m living in Oregon, which is also gorgeous.
Assignment #2 – Take a sightseeing trip, even if its just to somewhere local.  If you can’t get away from your town or city, think about what you could show a friend if they came to visit you.
Take photos as if you’re a tourist.  When you look at these photos, think about what you like about that place.  Is it the colors?  The curve of a particular tree trunk?  Try to make a project based just on what you liked.  Even if you feel like your hometown doesn’t have a thing going for it, you have an option.  Is there somewhere you’ve always wanted to visit?  Look up photos of that place.  Jot down what you like about it – again, is it the colors?  Is it a particular building?  Whatever it is, try to make a project out of it.  If you get stuck on the steps, go back to assignment #1.  Find the closest class/video/tutorial to it and follow those steps – now apply it to this project about this place.
3.      Splurge on New Tools!
 
When I moved to Taos I gave up my little hothead torch because someone told me that I couldn’t actually work it at that high an altitude.  I bought a new torch and although
we had a hate/hate relationship it turned out to be just large enough to handle
making more  dramatic and sculptural shapes…  Once I finally sold that torch
and bought my current torch, a Carlisle Hellcat, I really fell in love with
lampworking again.  I’m not telling you that a larger torch is better – I adored my little hothead – but for me that new Carlisle also opened new doors.
photo 3 – Danielle Wenger wearing a neckpiece I made for the Battle of The Beadsmiths in 2012.  My Carlisle torch made it possible for me to make large scale centerpieces like the dragon bead in this piece.  Photo by me.
After years of pining over a Carlo Dona Bellflower Press I finally splurged on one.  Its beautiful – and it is absolutely one of the simplest presses to use.  I ruined exactly one flower before I got the hang of it.
Routinely, Shawn brings in new tools for me to test – I’m partial to the hand turned hardwood handles.  You can find his tools at http://ShawnTuckerGlass.etsy.com
I’ve found that if you have a tool that fits comfortably in your hand,
you’ll really go out of your way to find reasons and ways to use it.  Most of the tools I owned but didn’t use were actually uncomfortable for me because I have super small hands.  Fortunately, if you end up with a tool you aren’t crazy about, sales are pretty easy.
Assignment #3 – Buy some stuff!  Shopping therapy is always
awesome.  Or, if you have a tool you’ve never used, now is the time to try it out!  Worried about how it works?  Go back to assignment #1 – look up a tutorial/video or take a class with it!
4.      Look at Art Books and Visit Museums
 
When I’m really stuck, I open Jansson’s History of Art.  There are centuries worth of inspiration in there. Be aware that some of the pieces still need permission to use as inspiration.
photo 4a – Beaded Cuff Bracelet based off one of the oldest pieces of
art in existence – the Lasceaux Cave Painting in France.
I also adore museums and was lucky enough to have had a grandmother who lived within walking distance of the Metropolitan Museum of Art in New York City.  Growing up, my parents were members of the Chicago Museum of Art, the Field Museum of Natural History and the Shedd Aquarium, all of which are world class.  Because they are so large, I usually go with an agenda but one day I found myself mesmerized by a ridiculous goldfish (yes, just a goldfish!) at the Aquarium while on my way to a completely different exhibit
photo 4b – Goldfish bead.  Photo by me.  Ain’t he silly?
Here in Grants Pass Oregon where I currently live, we don’t
have a huge museum but whenever I travel and visit a city with a good museum I
try to stop by and browse.  Don’t overlook the universities, either.  I
once saw a fantastic exhibit on Chinese textiles in a small hall at the Oregon
State University in Eugene.
Assignment #4 – Go to the library and get some art books or check out your local museum even if its little.  You’d be amazed how much better it is to see big glossy photos in a real art book or see things in real life instead of just on your computer screen. You generally can’t take photos at the museums, but you can jot down notes or doodle so bring a pad.  No library or museum in your town?  There are always online book stores. 
 
5.      Work and Play with Others
 
When you can, go to Open Torch Events.  Just visiting with other lampworkers can get
your creativity flowing.  As a matter of fact generally going to any art events can do the same thing, even if you are using different mediums – or think “how can I use these two mediums I enjoy doing IN THE SAME PIECE?”  Shawn and I routinely now do collaborative multimedia work that includes boro, soft glass, wire wrapping, seed beading and sometimes fiber.  Sometimes just working with another artist’s
bead can make for wonderful inspiration!
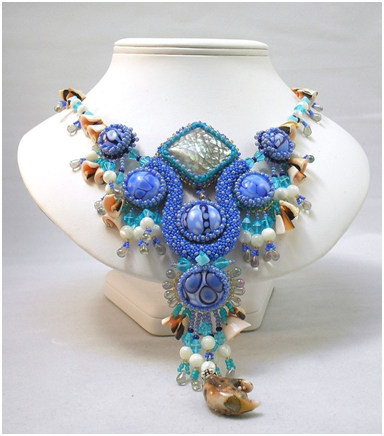
photo 5 – Neptune’s Collar.  This piece was designed around a John Winter
bead I purchased when I took a class from him at Bead & Button one year.  In class, I made beads to match the centerpiece and then added a color palette that augmented the colors in the beads.  Worn by Danielle Wenger.  I took the photo.
I’ve had the opportunity to teach twice with beading rock star Sherry Serafini.  We codesigned two separate projects and then taught them, once at a bead store in Georgia and once at Bead & Button.  When you can work with someone you enjoy, it sort of just feels like you’re partying.
Assignment #5 – Go to a retreat or a conference.  You’ll probably even be able to take a class there!  Nothing available in your area or not able to cover the hotel costs?  Then, head over to a local bead society for a meeting or go to a gallery opening, even if it just for a little gallery in your town.  Just talk to another artist.  Even
just going to hang with a lampwork buddy can inspire you – it doesn’t always have to be a collaborative piece; just bouncing ideas off someone can be inspiring.
6.      Challenge Yourself
 
Contests and Competitions might seem like a lot of stressbut they can also stretch you artistically! Remember, you don’t have to showthe finished project to anyone, so just do
it
.  Much of my inspiration thesedays comes from deadlines, whether it is for an online event like Battle of The Beadsmith, a magazine issue, a competition, a special order lampwork piece, or from Starman and/or Toho Beads sending me new unreleased beads to test.  I particularly like it when I’m given a palette of colors I wouldn’t generally put together and am asked to make something from them. 
Assignment #6 – Pick a challenge
and make it, even if the results are so bad they’re hilarious. 
Because lets face it, even if your finished project is theabsolute worst, I’ll bet it was
interesting to make a brand new thing.  Then look at it and think: “Well, next time I can make this better and here’s how…”
Enjoy!


I’m heading back to Gahanna Bead Studio near Columbus Ohio at the end of this month to teach!  There is still a bit of room in each class.

Airline tickets have been purchased and when I wrote this little blurb, I’d already sent out one box for a trunk show.  There should be many more boxes in the mail by the time this scheduled post hits.  Look for kits, tutorials, lampwork beads by both Shawn and I, finished jewelry and beaded objects.

I’m teaching two classes. To sign up, head to their website http://gahannabeadstudio.com/calendar/

Nouveau Vines Bracelet – Jan 25


Russian Treasure Bauble or Bracelet – Jan 26


Bead & Button 2020 Classes open for registration today!

I’m teaching two classes.  Photos of each are below.  To see more views and to register, follow the link.

http://www.beadandbuttonshow.com/store/classes?date=&time=&techniques=&skillLevel=1or&teacher=V002359&price=&classType=&q=

Nouveau Tendrils Bracelets

Bauble for a Romanov


Jewelry Consignment – Should You Try It?

Originally written For Artisan’s Jewelry Times, 2016.  I thought that I had already posted this, but can’t find it in my blog.  So if you’ve already read this, my apologies.

I often get approached at shows about consigning at galleries, and my bet is that if you make and sell jewelry online or at shows then you’ve had these requests as well. You’ve probably even considered consignment, but before you do it, you’ll want to do some careful research first about the shop.

I have had some wonderful experiences consigning. In particular, I’ve enjoyed consigning my work with two separate museum shops in Taos, New Mexico, as well as a wonderful experience with the John Hines History Museum gift shop in Pittsburgh. Museum shops are usually run beautifully. They have all their paperwork above board and also tend to be organized.

A few times a year, I have a consignment/pop-up trunk show of jewelry and lampwork sculpture (as well as beads and patterns) at my local bead store. I work for her once a week, just doing her ordering and organizing, so she basically gives me a space and lets me set up any way I want. My work is generally only there for a week or two at a time, so it doesn’t get stale and I break down the show and clean up myself.

Let’s take a look at some of the pros and cons of consigning at galleries.

Pros:

·        As a consignor, an artist gets to keep all the legal rights to his or her work until it is sold. In this way, you can establish a name for yourself in any particular regional area.

·        You can elect to remove the work from your gallery at any time (although the gallery may ask for a certain amount of time between the request and removal) and also can set the retail price. This means you can test new ideas, sell large scale, one-of-a-kind pieces, and also have your work on display somewhere while not doing shows or art fairs.

·        You can rotate your work on display, especially if the gallery is local.

·        Your work is more likely to sell if it is on display than languishing in your studio between shows.

·        The gallery takes responsibility for the overhead costs including rent, electricity, display, and promotion. Score!

Untitled1

 Mermaid’s Treasure Necklace – made from lampwork glass cabochons, abalone, mother of pearl, Czech and Japanese glass, sterling silver, shell shards and a crab claw lampwork pendant by Nancy Lawler.Sold via consignment. Photo by Hannah Rosner

Cons

·        Many galleries add a higher percentage to consignment pieces than pieces they buy outright. As a result, either your retail price has to be higher or you’ll end up making less per piece than outright wholesale.

·        In this economic climate, galleries are feeling the crunch. They need to have a full show floor in order to stimulate sales, but at the same time, many can’t afford to buy artwork outright. As a result, they offer a show space for you and pay you on a net-30 after they sell your item (in other words, they pay 30 days after the month in which it was sold). However, too often the demands of a brick and mortar shop take precedence over an artist who resides in another state. Faced with a utility bill versus paying an out-of-state artist, the shop nearly always goes with the pressing demands of keeping the shop open first.

·        Galleries are often more careful with damage to and display of items that they have invested in rather than items that have been freely loaned.

·        Consignment pieces are often not protected by a gallery’s insurance in case of damage (fire, water, etc), theft, or bankruptcy. If a gallery closes due to any of these reasons, artists are often out money and possibly their work.

·        Unless you really dig paperwork, keeping track of where your artwork is, whether it has sold and whether it has been paid for can be a real headache. Perfect records are a must!

What can I do to protect myself?

I now have a written agreement when I agree to consign. It’s really boring and lawyerly sounding, but it really does the trick. I found mine online by doing a web search for “consignment agreement for artists” and changed to wording to suit my needs. If you need help finding one, feel free to email me.

Let me leave you with one final thought. I have met some of my very closest friends via the galleries through which I’ve consigned. I really have to give a thank you to a Celtic Arts Gallery in Pittsburgh for pushing me to sell my jewelry; at the time, I was really nervous about the salability of my work. The family-owned business gave me a wonderful community and some of my now-best friends to show our work. Further, it really gave customers the opportunity to buy local and to buy from a small business. I truly count myself as lucky.

Sell everything!

Hannah